Picture this: a cold shower on a chilly morning. Not exactly the best way to start your day, right? Often, the culprit behind a water heater refusing to ignite isn't a major catastrophe, but a small, easily replaceable component called a thermocouple. Don't let a faulty thermocouple leave you shivering! This guide will walk you through the process of replacing it yourself.
Many homeowners dread the thought of water heater repairs, imagining complex systems and expensive professional fees. The frustration of a malfunctioning water heater can quickly escalate, particularly when it disrupts your daily routine and comfort. The potential for gas leaks and further damage only adds to the stress.
This comprehensive guide aims to empower you with the knowledge and confidence to replace your water heater's thermocouple. We'll cover everything from identifying a faulty thermocouple to the step-by-step replacement process, ensuring a safe and successful repair. This guide also explores related keywords and provides tips for maintaining your water heater for optimal performance.
In short, we will provide expert guidance on diagnosing a faulty thermocouple, step-by-step replacement instructions, safety precautions, troubleshooting tips, and preventative maintenance for your water heater. By understanding the function of a thermocouple and following our guide, you can confidently address this common water heater issue and potentially save money on professional repair costs. Remember keywords such as water heater repair, gas water heater, thermocouple replacement, pilot light, gas valve, and safety tips will come in handy.
Understanding the Thermocouple
The thermocouple is the unsung hero of your gas water heater, acting as a safety device that ensures gas only flows when the pilot light is lit. I remember the first time I encountered a thermocouple issue. My own water heater stubbornly refused to stay lit. After some research, I discovered the thermocouple was the likely cause. Armed with a new thermocouple and a healthy dose of skepticism, I cautiously followed the instructions I found online. To my surprise, the replacement was straightforward, and within an hour, I had hot water again! That experience taught me the importance of understanding basic appliance components and the satisfaction of a successful DIY repair.
Essentially, the thermocouple is a heat-sensitive sensor that generates a small electrical current when heated by the pilot light. This current signals the gas valve to stay open, allowing gas to flow to the main burner. If the pilot light goes out, the thermocouple cools down, the electrical current stops, and the gas valve shuts off, preventing a dangerous gas leak. Thermocouples are typically made of two dissimilar metals, such as copper and constantan, that generate a voltage when heated. Over time, thermocouples can become corroded or weakened, leading to failure and preventing the pilot light from staying lit. Recognizing the early signs of a failing thermocouple, such as a pilot light that repeatedly goes out, is crucial for timely replacement and preventing further issues. Regular inspection and cleaning can also help extend the lifespan of your thermocouple.
Tools and Materials You'll Need
Before diving into the replacement process, gather the necessary tools and materials. It's always better to be prepared than to be caught mid-repair without the right equipment. The history of DIY repairs is filled with ingenuity and resourcefulness. People have been fixing their own appliances for generations, often relying on simple tools and readily available materials. Thermocouple technology itself has evolved over time, with advancements in materials and design leading to more reliable and durable components. While modern thermocouples are more sophisticated than their predecessors, the basic principle remains the same: using heat to generate an electrical current for safety and control.
Misconceptions about water heater repairs often discourage homeowners from attempting DIY fixes. Some believe that only a licensed plumber can handle gas appliances, while others fear causing further damage. However, with proper preparation, careful execution, and adherence to safety precautions, replacing a thermocouple can be a manageable task for many homeowners. Understanding the function of the thermocouple and the specific steps involved in the replacement process can dispel these myths and empower you to take control of your home maintenance. Always remember to turn off the gas supply before starting any repairs and consult your water heater's manual for specific instructions.
Step-by-Step Replacement Guide
Now, let's get down to the nitty-gritty: the step-by-step process of replacing your water heater's thermocouple. Imagine you're about to unlock a hidden secret within your water heater. A faulty thermocouple can be a frustrating issue, causing your pilot light to repeatedly go out and leaving you without hot water. But the good news is that replacing it is often a straightforward process that you can tackle yourself with a little know-how and the right tools.
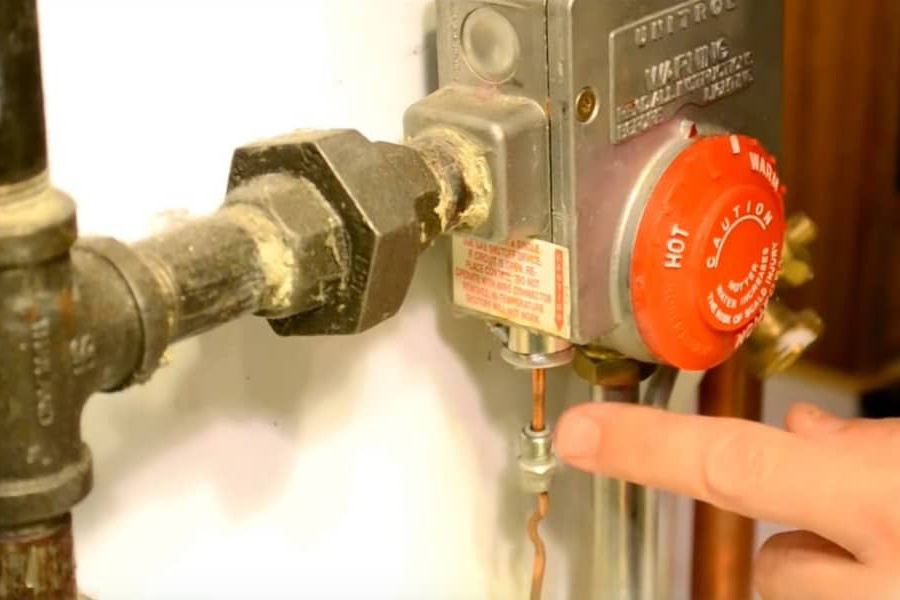
The key to success lies in following the steps carefully and paying attention to detail. First, always ensure the gas supply is turned off before starting any work. This is paramount for your safety. Next, locate the thermocouple near the pilot light assembly. You'll typically find it connected to the gas valve with a small nut or screw. Carefully disconnect the old thermocouple, noting its orientation for easy reinstallation of the new one. Once the old thermocouple is removed, install the new one, making sure to tighten the connection securely but not overtighten. Finally, relight the pilot light according to the manufacturer's instructions and test the new thermocouple to ensure it's working correctly. With a little patience and attention to detail, you'll be enjoying hot water again in no time. Remember to consult your water heater's manual for specific instructions and safety precautions.
Safety Precautions
Working with gas appliances requires utmost caution. Gas leaks can be extremely dangerous, leading to fire or explosion. Before starting any repair, always turn off the gas supply to your water heater. It is always recommended to contact a profession if there is a gas leak. Always start by switching off the gas supply. It's also a good idea to open windows and doors to ventilate the area. Never smoke or use open flames near the water heater while working on it. Double-check all connections to ensure they are tight and secure to prevent gas leaks. If you smell gas at any point during the repair, immediately evacuate the area and call your local gas company or a qualified professional.
Troubleshooting Tips
Even with careful execution, you might encounter some hiccups during the thermocouple replacement process. Sometimes, the pilot light may still refuse to stay lit after replacing the thermocouple. In such cases, check the gas valve to ensure it's functioning correctly. Also, inspect the pilot light assembly for any clogs or debris that might be obstructing the gas flow. If you're unsure about any aspect of the repair, don't hesitate to call a qualified technician. Remember that safety should always be your top priority. Proper ventilation is essential when working with gas appliances. Consider using a gas leak detector to ensure there are no leaks after completing the repair. Regular maintenance, such as flushing your water heater to remove sediment buildup, can also help prevent future problems.
Preventative Maintenance
Extending the lifespan of your water heater and preventing future thermocouple issues involves a few simple maintenance tasks. Consider this as a series of small steps you can take to safeguard your investment. Regular flushing of your water heater helps remove sediment buildup, which can reduce its efficiency and lifespan. You can also insulate your water heater to conserve energy and reduce heat loss. Regularly inspect the thermocouple and pilot light assembly for any signs of corrosion or damage. Replacing the thermocouple proactively every few years can prevent unexpected breakdowns. Furthermore, consider installing a water softener if you live in an area with hard water, as hard water can accelerate corrosion and sediment buildup. By taking these preventative measures, you can ensure your water heater operates efficiently and reliably for years to come.
Understanding the Pilot Light
The pilot light is a small, continuous flame that ignites the main burner in your gas water heater. It's the crucial link that connects the thermocouple to the gas valve. A weak or unstable pilot light can often indicate a problem with the thermocouple or the gas supply. Make sure the pilot light flame is strong and blue, not yellow or orange, as this could indicate incomplete combustion. If the pilot light is frequently going out, it's a sign that the thermocouple may be failing and needs to be replaced. Keeping the pilot light assembly clean and free of debris is essential for optimal performance. Regular inspection and maintenance can help prevent pilot light problems and ensure your water heater functions safely and efficiently. Remember to follow the manufacturer's instructions for relighting the pilot light after any maintenance or repairs.
Fun Facts About Thermocouples
Did you know that thermocouples aren't just used in water heaters? They're also used in a wide range of applications, from industrial furnaces to scientific instruments. Thermocouples work because of the "Seebeck effect," discovered by Thomas Johann Seebeck in 1821. This effect describes how a temperature difference between two dissimilar electrical conductors or semiconductors produces a voltage difference between them. Thermocouples can measure temperatures ranging from -200°C to over 2000°C, making them incredibly versatile. They are also relatively inexpensive and easy to use, which contributes to their widespread adoption. The accuracy of a thermocouple can be affected by factors such as the type of materials used, the temperature range, and the environmental conditions. Despite these limitations, thermocouples remain a reliable and cost-effective temperature sensing solution for many applications.
How to Choose the Right Thermocouple
Selecting the correct thermocouple for your water heater is crucial for ensuring proper operation and safety. Always consult your water heater's manual to determine the specific type of thermocouple required. Thermocouples come in various lengths and connector types, so it's essential to choose one that is compatible with your water heater model. Consider purchasing a high-quality thermocouple from a reputable supplier to ensure durability and reliability. Avoid using generic or low-quality thermocouples, as they may not provide accurate readings or last as long. When installing the new thermocouple, make sure the connection to the gas valve is tight and secure to prevent gas leaks. Remember that proper installation is just as important as selecting the right thermocouple. If you're unsure about which thermocouple to choose, consult a qualified technician for assistance.
What If the Problem Persists?
Even after replacing the thermocouple, you might still encounter issues with your water heater. If the pilot light continues to go out, there could be other underlying problems, such as a faulty gas valve, a clogged pilot light orifice, or a problem with the gas supply. A malfunctioning gas valve can prevent gas from flowing to the pilot light, even with a functioning thermocouple. A clogged pilot light orifice can restrict gas flow, resulting in a weak or unstable flame. Issues with the gas supply, such as low gas pressure, can also cause pilot light problems. In these cases, it's best to consult a qualified technician to diagnose and repair the problem. Attempting to fix complex gas appliance issues without proper training and experience can be dangerous. Remember that safety should always be your top priority. If you're unsure about the cause of the problem, seek professional assistance.
Top 5 Reasons to Replace Your Thermocouple
Here's a quick list of the top 5 reasons why you might need to replace your water heater's thermocouple: 1. The pilot light won't stay lit, even after repeated attempts.
2. The thermocouple is visibly corroded or damaged.
3. The thermocouple is old (over 5 years) and may be nearing the end of its lifespan.
4. You're experiencing inconsistent hot water temperatures.
5. You smell gas near the water heater (a potential sign of a gas leak). Addressing these issues promptly can help prevent further damage and ensure your water heater operates safely and efficiently. Regular maintenance, such as flushing your water heater and inspecting the thermocouple, can also help extend its lifespan. Remember to consult your water heater's manual for specific maintenance recommendations. If you're unsure about any aspect of the repair, seek professional assistance.
Question and Answer Section
Q: How do I know if my thermocouple is bad?
A: The most common symptom of a bad thermocouple is a pilot light that won't stay lit. You may be able to light the pilot, but it will go out as soon as you release the gas valve button.
Q: Can I clean my thermocouple instead of replacing it?
A: In some cases, cleaning a corroded thermocouple can temporarily restore its function. However, cleaning is usually a short-term fix, and it's generally recommended to replace the thermocouple for long-term reliability.
Q: Is it safe to replace a thermocouple myself?
A: Replacing a thermocouple is generally a safe DIY project if you follow all safety precautions and turn off the gas supply before starting. However, if you're uncomfortable working with gas appliances, it's best to call a qualified technician.
Q: How much does it cost to replace a thermocouple?
A: The cost of a new thermocouple typically ranges from $10 to $30. Professional installation can add to the cost, but replacing it yourself can save you money.
Conclusion of Thermocouple Replacement for Water Heaters: Full Repair Guide
Replacing a water heater thermocouple might seem intimidating initially, but hopefully, this guide has demystified the process. By understanding the function of the thermocouple, gathering the necessary tools, and following the step-by-step instructions, you can confidently tackle this repair and potentially save money on professional service fees. Remember to prioritize safety throughout the process, and don't hesitate to seek professional assistance if you're unsure about any aspect of the repair. With a little effort and patience, you can keep your water heater running smoothly and enjoy the comfort of reliable hot water.