Picture this: you're all set to hook up your RV at a new campsite, ready to relax and enjoy the great outdoors. But then, disaster strikes! You notice your city water connection is cracked, leaking, or just plain unusable. Suddenly, that relaxing getaway feels a lot less relaxing. Don't let a faulty water connection ruin your trip!
Dealing with a broken RV city water connection can be a real headache. It often happens at the most inconvenient times, leaving you without a crucial water source for drinking, showering, and other essential tasks. Finding the right replacement part and figuring out how to install it can also feel overwhelming, especially if you're not a seasoned RV repair expert. The frustration of potential water damage and the disruption to your travel plans only add to the stress.
This guide will walk you through a quick and easy process for replacing your RV's city water connection. We'll cover everything from identifying the correct replacement part to the step-by-step installation process, so you can get back to enjoying your RV adventures without the worry of leaks or water shortages. This isn't just about fixing a broken part; it's about restoring your peace of mind and ensuring a smooth and enjoyable RV experience.
In this guide, we'll cover the essential steps for replacing your RV city water connection, including identifying the correct replacement part, gathering the necessary tools, and following a step-by-step installation process. We'll also touch on common issues you might encounter and how to troubleshoot them, ensuring you can tackle this repair with confidence. So, get ready to equip yourself with the knowledge and skills to fix that faulty connection and get back on the road!
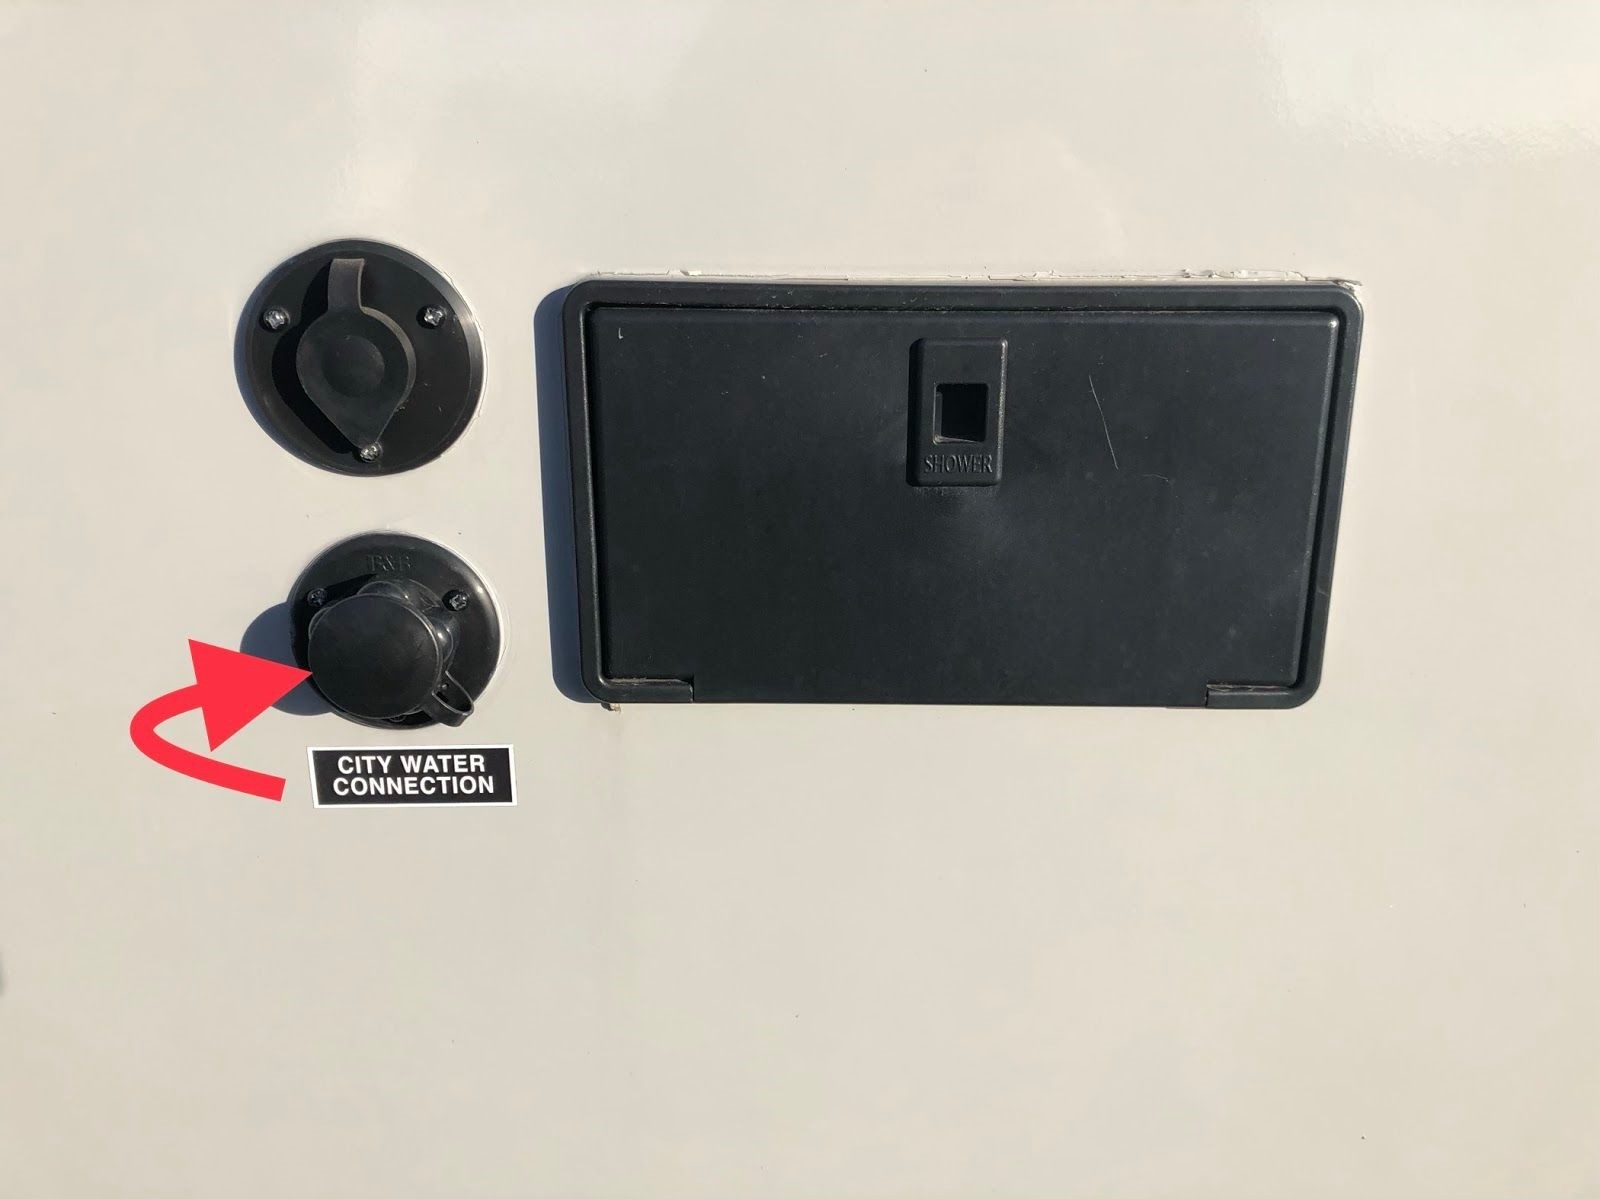
Identifying the Correct Replacement RV City Water Connection
Identifying the correct replacement part is probably the most important thing of replacing the city water connection. I remember one time when I went to replace my RV's city water connection. I thought all connections were created equal and just grabbed the first one I saw at the RV store. Big mistake! After struggling to get it to fit, I realized the threads were completely different. It was a frustrating waste of time and a lesson learned the hard way. Now, I always take the old connection with me or, better yet, take detailed pictures and measurements before heading to the store.
To identify the correct replacement, you need to consider several factors. First, examine your existing connection closely. Note the material (plastic, brass, or metal), the type of threads (male or female), and the diameter of the connection. Taking a picture or even bringing the old part with you to the store can be incredibly helpful. Different RV manufacturers use different types of connections, so what works for one RV might not work for another. Check your RV's manual or contact the manufacturer to confirm the specific type of connection required. Online retailers often have detailed product descriptions and compatibility charts that can help you narrow down your search.
Pay close attention to the thread type – is it National Pipe Thread (NPT) or something else? NPT is a common standard, but there are variations in the thread pitch and diameter. Using the wrong thread type can lead to leaks and damage to the connection. Also, consider the angle of the connection. Some RVs use straight connections, while others use 45-degree or 90-degree angles to accommodate tight spaces. Make sure the replacement part matches the angle of your existing connection to ensure a proper fit. If you're unsure, ask a knowledgeable salesperson at the RV store for assistance. They can help you identify the correct part based on your RV's make and model.
Tools and Materials Needed
Replacing an RV city water connection doesn't require a huge arsenal of tools, but having the right ones on hand will make the job much easier and prevent unnecessary headaches. You'll need a wrench (adjustable or the correct size for your connection), Teflon tape or pipe sealant, a screwdriver (usually a Phillips head), and a bucket or container to catch any water that might spill. It's also a good idea to have a utility knife for trimming any excess sealant and a pair of pliers for gripping stubborn connections. Don't forget a flashlight to illuminate those hard-to-see areas.
Beyond the basic tools, there are a few other materials you might need. A new city water connection, of course, is the most important. Choose a high-quality replacement made from durable materials like brass or reinforced plastic. A roll of Teflon tape is essential for creating a watertight seal on the threads. Apply several layers of Teflon tape in the direction of the threads to ensure a tight fit. Alternatively, you can use pipe sealant, which is a liquid or paste that hardens to form a seal. Pipe sealant can be more effective than Teflon tape in certain situations, but it can also be messier to apply. A small piece of sandpaper or a wire brush can be useful for cleaning the threads of the old connection before installing the new one. This will help the Teflon tape or pipe sealant adhere properly.
Finally, consider having a few extra items on hand in case of unexpected issues. A small container of penetrating oil can help loosen stubborn connections that are difficult to remove. A set of replacement screws or bolts can be useful if the old ones are corroded or damaged. And don't forget a pair of gloves to protect your hands from dirt and grime. With the right tools and materials, you'll be well-prepared to tackle this repair with confidence and efficiency.
A Brief History of RV Water Systems
The history of RV water systems is intertwined with the evolution of recreational vehicles themselves. In the early days of camping, water was often sourced from nearby streams or wells and carried in buckets. As RVs became more sophisticated, onboard water tanks and hand-pumped faucets were introduced, offering a more convenient way to access water. These early systems were relatively simple, consisting of a tank, a pump, and a few basic fixtures.
The development of city water connections was a significant step forward in RV water system technology. It allowed RVers to connect directly to a pressurized water source at campgrounds, eliminating the need to rely solely on onboard tanks. This innovation made RVing more comfortable and convenient, especially for longer trips. Over time, city water connections have evolved to become more durable and reliable. Early connections were often made of brass or copper, but modern connections are increasingly made of reinforced plastic, which is lighter, more resistant to corrosion, and less expensive.
Today, RV water systems are complex and sophisticated, featuring advanced filtration systems, on-demand water heaters, and even electronic monitoring systems. However, the basic principle of connecting to a city water source remains the same. Replacing an RV city water connection is a relatively simple repair that can be performed by most RV owners with a few basic tools and materials. Understanding the history of RV water systems can help you appreciate the convenience and reliability of modern connections and inspire you to keep your system in good working order.
The Hidden Secret to a Leak-Proof Connection
The "hidden secret" to achieving a leak-proof connection when replacing your RV's city water inlet isn't really a secret at all, but rather a combination of attention to detail and proper technique. It all boils down to ensuring a tight, secure seal between the connection and the RV's plumbing system. This involves several key steps, starting with properly preparing the threads.
Before applying any sealant, thoroughly clean the threads of both the new connection and the RV's water inlet. Use a wire brush or sandpaper to remove any dirt, corrosion, or old sealant residue. This will provide a clean surface for the sealant to adhere to. Next, apply Teflon tape or pipe sealant to the threads. Teflon tape should be wrapped around the threads in the direction they tighten, typically two to three times. Pipe sealant should be applied evenly around the threads, ensuring complete coverage. When tightening the connection, don't over-tighten it. Over-tightening can damage the threads and actually create leaks. Tighten the connection until it's snug, then give it another quarter turn. If you're using Teflon tape, you should be able to feel the tape compress as you tighten the connection. If you're using pipe sealant, some sealant should squeeze out of the connection as you tighten it. Finally, test the connection for leaks by turning on the water supply. If you see any leaks, tighten the connection slightly. If the leaks persist, disassemble the connection, reapply sealant, and try again.
Another key factor in achieving a leak-proof connection is using high-quality replacement parts. Cheaper connections are often made from inferior materials that are more prone to cracking and leaking. Invest in a high-quality connection made from durable materials like brass or reinforced plastic. By paying attention to detail and using proper techniques, you can ensure a leak-proof connection that will keep your RV water system running smoothly.
RV City Water Connection: Expert Recommendations
When it comes to RV city water connections, not all parts are created equal. Choosing the right connection can make a big difference in terms of durability, reliability, and ease of installation. That's why it's important to seek out expert recommendations and do your research before making a purchase. One of the most important factors to consider is the material of the connection. Brass connections are generally considered to be the most durable and corrosion-resistant, but they can also be more expensive. Reinforced plastic connections are a more affordable option that still offers good durability and resistance to corrosion. When selecting a connection, make sure it's compatible with your RV's plumbing system. Check the thread size and type to ensure a proper fit.
Another important consideration is the ease of installation. Some connections are easier to install than others. Look for connections that come with clear instructions and all the necessary hardware. If you're not comfortable installing the connection yourself, you can always hire a professional RV technician. In addition to the connection itself, you may also want to consider purchasing a few accessories, such as a water pressure regulator and a water filter. A water pressure regulator will protect your RV's plumbing system from damage caused by high water pressure. A water filter will remove sediment and other contaminants from your water supply. When choosing a water filter, look for one that's designed for RV use and has a high flow rate.
Finally, don't forget to read reviews from other RV owners before making a purchase. Reviews can provide valuable insights into the quality and performance of different connections. Look for reviews that mention durability, ease of installation, and leak resistance. By following these expert recommendations, you can choose the right RV city water connection for your needs and ensure a reliable and leak-free water supply.
Step-by-Step Replacement Guide
Okay, let's get down to the nitty-gritty. Here's a step-by-step guide to replacing your RV's city water connection:
- Turn off the water supply: Before you do anything else, make sure to disconnect your RV from the city water source and drain any remaining water from the lines. This will prevent a messy situation and ensure your safety.
- Remove the old connection: Use a wrench to loosen and remove the old city water connection. Be careful not to damage the surrounding plumbing. If the connection is stubborn, you can use a penetrating oil to help loosen it.
- Clean the threads: Use a wire brush or sandpaper to clean the threads of the RV's water inlet. This will ensure a good seal with the new connection.
- Apply Teflon tape or pipe sealant: Wrap Teflon tape around the threads of the new connection in the direction they tighten, or apply pipe sealant evenly around the threads.
- Install the new connection: Carefully thread the new connection into the RV's water inlet and tighten it with a wrench. Don't over-tighten it, as this can damage the threads.
- Test for leaks: Turn on the water supply and check for leaks around the new connection. If you see any leaks, tighten the connection slightly or reapply Teflon tape or pipe sealant.
That's it! With a little patience and the right tools, you can easily replace your RV's city water connection and get back to enjoying your camping adventures. If you're not comfortable performing this repair yourself, you can always hire a professional RV technician to do it for you.
Tips for a Successful Replacement
Replacing your RV's city water connection is a straightforward task, but there are a few tips that can help ensure a successful and leak-free repair. First, always use high-quality replacement parts. Cheaper connections are often made from inferior materials that are more prone to cracking and leaking. Invest in a durable connection made from brass or reinforced plastic. Second, take your time and be patient. Don't rush the process, as this can lead to mistakes. Carefully follow the instructions and take breaks as needed. Third, use the right tools for the job. Using the wrong tools can damage the connection or the RV's plumbing system. Make sure you have the correct size wrench and screwdriver.
Fourth, apply Teflon tape or pipe sealant properly. Teflon tape should be wrapped around the threads in the direction they tighten, typically two to three times. Pipe sealant should be applied evenly around the threads, ensuring complete coverage. Fifth, don't over-tighten the connection. Over-tightening can damage the threads and actually create leaks. Tighten the connection until it's snug, then give it another quarter turn. Sixth, test the connection for leaks after installation. Turn on the water supply and check for leaks around the new connection. If you see any leaks, tighten the connection slightly. If the leaks persist, disassemble the connection, reapply sealant, and try again. Seventh, consider using a water pressure regulator. A water pressure regulator will protect your RV's plumbing system from damage caused by high water pressure. High water pressure can damage the connection and other plumbing components.
Eighth, inspect the connection regularly. Check the connection for cracks, leaks, and corrosion. If you notice any problems, replace the connection immediately. Ninth, winterize your RV properly. Freezing temperatures can damage the connection and other plumbing components. Make sure to drain the water from your RV's plumbing system and add antifreeze before winter. By following these tips, you can ensure a successful and leak-free RV city water connection replacement.
Troubleshooting Common Problems
Even with the best preparation, you might encounter a few snags during the replacement process. Here are some common problems and how to troubleshoot them:
- Stubborn old connection: If the old connection is difficult to remove, try applying penetrating oil to the threads and letting it sit for a few minutes. You can also use a heat gun to gently warm the connection, which can help loosen it. Be careful not to overheat the surrounding plumbing.
- Leaking new connection: If the new connection leaks after installation, try tightening it slightly. If the leaks persist, disassemble the connection, reapply Teflon tape or pipe sealant, and try again. Make sure you're using the correct type of sealant for your connection.
- Cross-threading: If you accidentally cross-thread the new connection, stop immediately. Cross-threading can damage the threads and make it impossible to create a tight seal. Carefully remove the connection and inspect the threads for damage. If the threads are damaged, you may need to replace the RV's water inlet.
- Incorrect replacement part: If the new connection doesn't fit properly, it's likely that you have the wrong replacement part. Double-check the thread size and type to ensure a proper fit. Consult your RV's manual or contact the manufacturer to confirm the correct replacement part.
By being prepared for these common problems, you can troubleshoot them quickly and efficiently and get your RV's water system back up and running in no time.
Fun Facts About RV Water Systems
Did you know that the average RV water tank holds between 30 and 100 gallons of water? That's enough water for several showers, loads of dishes, and countless cups of coffee! RV water systems are designed to be self-contained, allowing you to camp in remote locations without access to city water. However, most RVers prefer to connect to a city water source whenever possible, as this provides a continuous supply of water and eliminates the need to conserve. The first RVs didn't have any water systems at all. Campers had to carry water in buckets or jugs from nearby streams or wells.
RV water pumps are typically designed to deliver water at a pressure of around 40 to 50 PSI (pounds per square inch). This is similar to the water pressure in most homes. RV water heaters can heat water to temperatures ranging from 100 to 140 degrees Fahrenheit. Some RVs have tankless water heaters, which provide an endless supply of hot water on demand. RV water filters are essential for removing sediment, chlorine, and other contaminants from your water supply. This will improve the taste and odor of your water and protect your RV's plumbing system from damage. RV water systems are designed to be winterized to prevent damage from freezing temperatures. Winterizing involves draining the water from the system and adding antifreeze. RV water systems are a complex and fascinating part of RVing. By understanding how they work, you can keep your system in good working order and enjoy a comfortable and convenient camping experience.
Many RVers use a "water bandit" to fill their fresh water tank. A water bandit is a small rubber fitting that connects to a faucet without threads, allowing you to fill your tank from almost any water source.
How to Prevent Future Connection Problems
Preventing future problems with your RV's city water connection is all about proactive maintenance and careful usage. One of the best things you can do is to regularly inspect the connection for any signs of wear and tear, such as cracks, leaks, or corrosion. Catching these problems early can prevent them from escalating into more serious issues.
Another important preventative measure is to use a water pressure regulator. Many campgrounds have high water pressure, which can put a strain on your RV's plumbing system, including the city water connection. A water pressure regulator will limit the water pressure to a safe level, protecting your plumbing from damage. When connecting to a city water source, always use a high-quality water hose. Cheap hoses can crack and leak, leading to water damage. Choose a hose that is specifically designed for RV use and is made from durable materials. Store your water hose properly when not in use. Avoid leaving it exposed to the sun or extreme temperatures, as this can cause it to deteriorate. Coil the hose neatly and store it in a dry place.
During the winter months, make sure to winterize your RV's water system properly. This involves draining the water from the system and adding antifreeze to prevent freezing. Freezing temperatures can cause the connection to crack and leak. When disconnecting from a city water source, always disconnect the hose from the faucet first, then from the RV. This will prevent water from spraying back into the RV's plumbing system. Finally, consider using a water filter to remove sediment and other contaminants from your water supply. This will protect your RV's plumbing system from damage and improve the taste and odor of your water.
What If the Threads are Stripped?
Discovering stripped threads on your RV's city water inlet can be a frustrating experience, but it doesn't necessarily mean you need to replace the entire inlet. Depending on the severity of the damage, there are a few options you can try. If the threads are only slightly damaged, you might be able to get away with using a thread repair kit. These kits typically include a tap and die set that allows you to re-cut the threads and restore them to their original condition. Follow the instructions carefully and use plenty of cutting oil to avoid damaging the threads further.
If the threads are more severely damaged, you might need to use a thread insert. Thread inserts are small metal coils that are inserted into the damaged threads to provide a new surface for the connection to screw into. To install a thread insert, you'll need to drill out the damaged threads and tap the hole to accept the insert. Then, simply screw the insert into the hole using a special tool. If the damage is too extensive to repair, you'll need to replace the entire city water inlet. This is a more involved repair that may require some plumbing experience. Disconnect the water supply and drain any remaining water from the lines. Use a wrench to loosen and remove the old inlet.
Install the new inlet, making sure to apply Teflon tape or pipe sealant to the threads. Tighten the connection securely and test for leaks. If you're not comfortable performing this repair yourself, you can always hire a professional RV technician. No matter which option you choose, it's important to address stripped threads as soon as possible. Ignoring the problem can lead to leaks and water damage.
Listicle: 5 Reasons to Replace Your RV City Water Connection
- Leaks: A leaky city water connection can waste water, damage your RV's interior, and attract pests. Replacing a leaky connection will prevent these problems and save you money on water bills.
- Cracks: Cracks in the connection can weaken the structure and lead to leaks. Replacing a cracked connection will prevent it from failing completely and causing a major water leak.
- Corrosion: Corrosion can damage the threads of the connection and make it difficult to create a tight seal. Replacing a corroded connection will ensure a secure and leak-free connection.
- Age: Over time, the materials in the connection can deteriorate and become brittle. Replacing an old connection will prevent it from failing unexpectedly and causing a water leak.
- Peace of mind: Knowing that your RV's city water connection is in good working order will give you peace of mind and allow you to enjoy your camping trips without worrying about water leaks.
Question and Answer Section:
Q: How do I know if my RV city water connection needs to be replaced?
A: Look for signs of leaks, cracks, corrosion, or difficulty connecting a water hose. If you notice any of these issues, it's time to consider replacing the connection.
Q: Can I replace the city water connection myself, or do I need to hire a professional?
A: If you're comfortable with basic plumbing tasks and have the right tools, you can likely replace the connection yourself. However, if you're not confident in your abilities, it's best to hire a professional RV technician.
Q: What type of sealant should I use on the threads of the new connection?
A: Teflon tape or pipe sealant are both good options. Make sure to apply the sealant properly to create a watertight seal.
Q: How often should I inspect my RV city water connection?
A: It's a good idea to inspect the connection at least once a year, or more often if you frequently use your RV.
Conclusion of Replacing RV City Water Connection
Replacing your RV's city water connection might seem like a daunting task, but with the right knowledge and a little effort, it's a repair that most RV owners can handle themselves. By following the steps outlined in this guide, you can quickly and easily replace your faulty connection, ensuring a reliable water supply and preventing costly water damage. Don't let a leaky connection ruin your RV adventures – take control and get back on the road with confidence!